Leaves for Gate Flowering Vine

Ok. This is going to be a long entry. Grab your favorite drink, relax, and go with the flow.


This style of leaf uses a lot of material so I’m starting with one inch by a quarter inch flat bar.


With the hardy chisel clamped in the leg vice, I hot cut the bar stock at 45 degrees.


Then I forge it to a point with a bend in the end using the remainder of the leaf left in the bar.


After a reheat in the forge I use a fuller tool to create the transition at the base of the leaf where the stem starts.


I continue fullering down the bar to reduce the size of the material. This is the stuff that gets me excited.


After another reheat, I’ll be using that phrase a lot, I move the material out to the end of the horn and fuller some more to reduce the cross-section of the stem further.


After another reheat I hot cut the leaf and stem off the bar stock and return the leaf back into the forge. At this point I use the heat left in the leftover bar stock to start the process all over again for another leaf.


This process will take several trips back to the forge for more heat. First you forge the stem square, then octagonal, then round. Each time you progress through those steps the stem gets smaller and smaller in diameter.


It takes one more time at the tip of the anvil horn to smooth out the transition next to the leaf. Then back to the face to round out the entire stem to its final diameter.


Here is where the fun begins. I use the step of the anvil to fuller out the width of the leaf


It takes two reheat and fuller cycles to get the leaf to the correct width.


In this picture I’m doing two things at once. I am fullering the material down to the base of the leaf on the right side and I’m creating the leaf veining. If you’re still with me, hang in there, we’re almost done.


After a reheat, I fuller and vein the left side of the leaf. Both left and right sides will require two cycles of fullering and veining to get the final texture. As the part gets thinner and thinner, my time to forge gets shorter and shorter. If I hit the part too much while it is cold, it will work harden and crack.


After a reheat, I use the step to crease the leaf and give it some life.

You’re probably getting tired of me saying this but, after another reheat to shape the stem, I use blacksmith magic to make the leaf come alive.


There is another leaf hiding in that piece of bar stock. Can you see it?


 I take the new leaf (upper left) over to the gate parts and she finds a home with her other friends.


They (flowers and leaves) look like colored jewels to me. I will probably move the flowers and leaves around five or six more times before I’m happy with their location.


It’s a lot of work but I find it very rewarding

English Style Garden Gate


Well here we go. I start with my client approved design, measurements from the location and a blank floor as my canvas.


I make a full scale drawing of the design to guide me as I forge and weld. It also allows me to catch design mistakes before I make them on the real thing. The Devil is in the details.

  
I like to have the client stop by the studio to see the full scale drawing and to get a feel for the scale and proportion of the gate. It also gives me an opportunity to discuss material sizes and any changes I might need to make and get their approval.


As I make progress on the framework, I mentally start working on the forged details. 


The flowers will be made of 16 gage mild steel. I rough them out with my band saw and grid them to finished shape.


I had to make a bottom die to crease the front of the flower.


Then I had to make another bottom die to crease the back of the flower.


Now the flower goes in the forge. Just looking at this gets me excited.

Again I stoped to make more tooling. This tooling pushes the flower into into its basic shape.

I know what you’re thinking. Does it really take all this effort just to make one flower? No, it takes more. More hammering, more shaping, and more fun.

Forged Flower


I made a forged flower for my wife for Valentines Day. Without her support and encouragement, none of this would have been possible. Thanks Joyce, you're the best!

Forged Letter Opener


To begin the letter opener process I cut off 7 1/2" of 1/4" mild steel square stock.


Then I take it to the flypress to emboss lines that will be twisted.


Here's what the part looks like after embossing lines with the flypress.


Now the part is put in the gas forge and heated.


This is what the metal looks like as I start forging the blade.


After several reheats in the forge and a lot of hammering the blade is finished.


Then I clamp the part in a vice and heat the embossed lines and twist them.


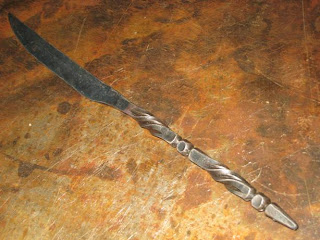
I forge the handel end to a point and then I use this tool to create square beads between the twists.


After all the twisting and beading the part needs to be straightened so I use a wood block and mallet so I don't damage the sruface.


To finish the letter opner I use a patina to darken the metal then dip it in hot bees wax.


I know, I know, hurry up and finish allready. Well here it is! Like fine wine, good things take time.
This is a wedding gift for some friends who wrote letters to one another while courting.